By popular demand, this is a series showcasing various protective hair styles. Protective styling does not have to be boring. :o)
Now granted only a portion of these styles are protective, but I just had to share the following find. (Click on the picture to view a larger image.)
Showing posts with label Short Natural Hair. Show all posts
Monday, April 8, 2013
Thursday, June 7, 2012
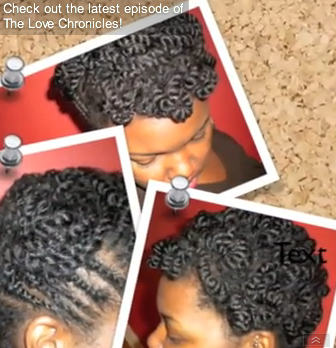
Protective Style Lookbook || Flat Twist with "Twist Rings"
By popular demand, this is a series showcasing various protective hair styles. Protective styling does not have to be boring. :o)
Model: CharyJay
Style description: Side flat twists into twist rings. (Can be done on short hair as well.)
Difficulty level: 4/5
Beginner's Guide: video tutorial on flat twisting; video tutorial on this style (also included below)
You can now find HHB on Facebook. Share with your friends:
Monday, May 14, 2012
Protective Style Lookbook || Vintage Pin Up (Shorter Hair)
By popular demand, this is a series showcasing various protective hair styles. Protective styling does not have to be boring. :o)
Model: Iknowlee
Style description: Elegant vintage pin up on twists. (Can also be done on braids.)
Difficulty level: 3/5
You can now find HHB on Facebook. Share with your friends:
Friday, February 11, 2011
Short Twist/Braid Styles: Part III
Cute, professional twist and braid styles for shorter hair. The 3rd in a three-part series.
Two-strands Flat Twisted #1:
Two-strand Twists Flat Twisted #2:
Regular Flat Twists (or Cornrows) into Twists:
The style: Flat-twisted Twists, French-braided Twists, etc.
Duration of wear: your choice
Great for:
+working with your scalpiness (if any);
+creating the illusion of length;
How to (recommended):
1.) Start with a set of neatly parted twists. This pre-step is important for those with with fine hair and/or scalpiness. When twisting, do neat and defined parts. Then proceed to the next step. (Those with thick hair may fair fine with "grab and go" twists.)
2.) Take several rows of twists and flat twist each one into your desired style (e.g., updo).
1.) Start with a set of neatly parted twists. This pre-step is important for those with with fine hair and/or scalpiness. When twisting, do neat and defined parts. Then proceed to the next step. (Those with thick hair may fair fine with "grab and go" twists.)
2.) Take several rows of twists and flat twist each one into your desired style (e.g., updo).
Amp it up a notch: If you know how to flat twist or cornrow loose hair, then go ahead! Mix up your style by flat twisting or corn rowing the sides or front of your hair and then two-strand twisting the remaining section. (To learn how to flat twist, check this earlier post. The videos included there taught me how to flat twist!)
Amp it up further: Add a cute hair clip and put on your favorite sparkling, studded earrings (or bold long earrings) to transform your day look into night.
Two-strands Flat Twisted #1:
Two-strand Twists Flat Twisted #2:
Regular Flat Twists (or Cornrows) into Twists:
Saturday, February 5, 2011
Short Twist/Braid Styles: Part II
Cute, professional twist and braid styles for shorter hair. The 2nd in a three-part series.
+minimizing knots;
+strands that unravel too easily in twists
Mini box braid tutorial (3c/4a):
The style: Mini/medium box braids (pinned to the side)
Duration of wear: 3-4 weeks (recommended)
Great for:
+minimizing shrinkage; +minimizing knots;
+strands that unravel too easily in twists
How to (recommended): Do on dry, stretched hair to show more of your length. (The hair does not need to be blow dried or flat ironed. Airdrying in plaits or twists is sufficient.) Apply a butter and/or gel on the ends for a natural curl or coil. The other option is to perm rod the ends. NOTE: The box braids do not have to be mini; you can make them a little bigger to save time.
Amp it up a notch: Once your box braids are complete, flat twist a few of them on the sides to create a beautiful updo (see this video). Another option is to use bobby pins instead.
Mini box braid styles:
Mini box braid tutorial (4a/4b):
Mini box braid tutorial (3c/4a):
Thursday, February 3, 2011
Short Twist/Braid Styles: Part I
Cute, professional twist and braid styles for shorter hair. The first in a three-part series.
The style: Micro/mini twists; "wet-n-go" micro/mini twists
Duration of wear: 2 weeks max if your hair locs easily
Hair type: ideal for the tightly curled to the kinky (like me)
How to (recommended): Do on damp hair to achieve volume. Do on mostly dry, stretched hair for length. Apply a butter and/or gel on the ends for a natural curl or coil. "Grab and go" as you twist. There is no need to make neat parts for this particular style.
Amp it up a notch: I call this the "wet-n-go" twist set. Wet your twists every 2-3 days. Apply a light conditioner first, then let the water run through the strands without manipulating the hair. Afterwards, spritz with a water-oil based moisturizer or a leave-in conditioner. Your natural coils or curls will come to life and your hair will be more voluminous. (The micro twists help kinkier strands to "clump" together and form coils on the ends.) That's it! Add a headband, pin to one side, or put on cute earrings to accessorize.
If you're prone to single-strand knots: After wetting, apply perm rods, band, or cornrow the twists until dry. Unravel for a stretched but curly look.
Mini Twists:
More Mini Twists:
![]() |
| During my 2nd year natural: Co-washed micro twists after airdrying (left) and micro twists pinned into a style (right). |
Duration of wear: 2 weeks max if your hair locs easily
Hair type: ideal for the tightly curled to the kinky (like me)
How to (recommended): Do on damp hair to achieve volume. Do on mostly dry, stretched hair for length. Apply a butter and/or gel on the ends for a natural curl or coil. "Grab and go" as you twist. There is no need to make neat parts for this particular style.
Amp it up a notch: I call this the "wet-n-go" twist set. Wet your twists every 2-3 days. Apply a light conditioner first, then let the water run through the strands without manipulating the hair. Afterwards, spritz with a water-oil based moisturizer or a leave-in conditioner. Your natural coils or curls will come to life and your hair will be more voluminous. (The micro twists help kinkier strands to "clump" together and form coils on the ends.) That's it! Add a headband, pin to one side, or put on cute earrings to accessorize.
If you're prone to single-strand knots: After wetting, apply perm rods, band, or cornrow the twists until dry. Unravel for a stretched but curly look.
Mini Twists:
More Mini Twists:
Labels:
Short Natural Hair
Wednesday, February 2, 2011
Coming Soon ... Short Twist/Braid Styles
Hi ladies,
I've been receiving a couple of comments about twist/braid styles on shorter hair that are actually cute and/or professional. Starting Friday, I'll do a three-part series on the topic. In the meantime, here are some tips:
-rock your twists/braids under a wig
-accessorize with beautiful earrings and makeup
-rock your twists/braids under a cute beanie or hat
-slip on a cute headband or scarf
-rod your twists/braids for a voluminous, curly look
-flat twist or cornrow into twists/braids updo
I've been receiving a couple of comments about twist/braid styles on shorter hair that are actually cute and/or professional. Starting Friday, I'll do a three-part series on the topic. In the meantime, here are some tips:
-rock your twists/braids under a wig
-accessorize with beautiful earrings and makeup
-rock your twists/braids under a cute beanie or hat
-slip on a cute headband or scarf
-rod your twists/braids for a voluminous, curly look
-flat twist or cornrow into twists/braids updo
Labels:
Short Natural Hair
Wednesday, July 14, 2010
Type 4 Series: Short Styles I (Simple 'n Go)
This is a series on how to style and manage type 4 hair healthily. This particular post is for natural hair; stretchers and transitioners, stay tuned!
Today's topic: Styling short, necklength hair. Part I.
Future topic: Styling short, necklength hair. Part II.
*******************
Chances are if your hair is type 4 necklength, it shrinks up to a TWA. Well, mine did. I remember during that stage, two styles were my best friends - the twistout fro and the wash-n-go fro. They were simple at that stage. They were quick. They looked cuter than my short twists (which I was not liking at that length). I will admit that I felt like a boy at first, but when I added a flower, scarf, earrings, or eye shadow, that all changed.
The woman in the following video is the epitome of someone rocking her type 4 short hair with confidence. Yes, confidence is an accessory needed to wear your "nappy short" hair ... especially in a society where "that kind of hair" is "unusual".
The next time you're stuck in a styling rut, remember this video. Styling short type 4 hair does not have to be complex; just fluff and go, wash and go, or do a twist out and go. Enjoy the simplicity of your hair at that length because once it grows (believe me), you're in a whole other ball park.
Yaasoulrebel's channel
Here's another type 4 (who you may know) rocking her short hair with various stylish headbands:
Mae's channel
Today's topic: Styling short, necklength hair. Part I.
Future topic: Styling short, necklength hair. Part II.
*******************
Chances are if your hair is type 4 necklength, it shrinks up to a TWA. Well, mine did. I remember during that stage, two styles were my best friends - the twistout fro and the wash-n-go fro. They were simple at that stage. They were quick. They looked cuter than my short twists (which I was not liking at that length). I will admit that I felt like a boy at first, but when I added a flower, scarf, earrings, or eye shadow, that all changed.
The woman in the following video is the epitome of someone rocking her type 4 short hair with confidence. Yes, confidence is an accessory needed to wear your "nappy short" hair ... especially in a society where "that kind of hair" is "unusual".
The next time you're stuck in a styling rut, remember this video. Styling short type 4 hair does not have to be complex; just fluff and go, wash and go, or do a twist out and go. Enjoy the simplicity of your hair at that length because once it grows (believe me), you're in a whole other ball park.
Yaasoulrebel's channel
Here's another type 4 (who you may know) rocking her short hair with various stylish headbands:
Mae's channel
Subscribe to:
Posts (Atom)